Pages

Saturday, November 27, 2010

Day 81! Jamaica- Jamaican Jerked Chicken with Red Beans and Coconut Rice- Up Next, Japan


 Here's what I know: Cooking keeps me sane (okay, no need to dissect the actual definition of sane). Let's just say that life with a certain teenager has challenged me to my very core and were it not for the structure, adventure and creative outlet of this project, I don't quite know where I'd be. Suffice it to say that the things I'm dealing with now were not in ANY of the baby books I ever read.  But the show must go on, and so shall I.

To find just the right recipe for Jamaican Jerked Chicken, I turned to one of my treasured cookbooks, the Black Family Dinner Quilt Cookbook, given to me by a friend years ago. It's a beautiful cookbook whose title honors the African American tradition of quilting and pays homage to Dorothy Height, president of the National Council of Negro women for forty years, as well as an activist and educator. The book is filled with delicious recipes whose roots are African, Southern, Caribbean our family has enjoyed for years.

Located in the Greater Antilles in the Caribbean Ocean,  Jamaica is an island nation whose neighbors include Cuba, Haiti and the Dominican Republic. Jamaica's indigenous Taino people originally named the island Xaymaca or the land of wood and water.


Jamaica's cuisine has been influenced by the Spanish, British, African, Indian and Chinese cultures and is known for its abundant seafood and tropical fruit. Some of Jamaica's signature dishes include curry goat (one of my favorites), fried
dumplings, meat patties, ackee, plantains, jerk, rice and...red beans & rice as celebrated by Spearhead in the video below.


Ackee - Jamaica's National Fruit


Habanero Peppers and Thyme flavor the Jerk Marinade

Scallions, coconut milk and Thyme make for tasty red beans and rice


Jamaican Jerked Chicken (Adapted from The Black Family Dinner Quilt Cookbook)
(Serves 12 - I cut the recipe in half)
  • 1 1/2 cups soy sauce
  • 1 cup freshly squeezed lime juice
  • 1 cup thinly sliced fresh ginger
  • 1/2 cup chopped fresh garlic
  • 4 green onions, trimmed and roughly cut
  • 2 Habanero peppers, seeded
  • 1 cup apple cider vinegar
  • 1/2-3/4 cup brown sugar
  • 1/2 canola oil
  • 1/4 cup ground allspice
  • 2 Tbsp. molasses
  • 2 tsp. cinnamon
  • 2 tsp. freshly chopped thyme
  • 1 tsp. pepper
  • 1/2 tsp. ground nutmeg
  • 1/2 tsp. ground cloves
  • 16-24 chicken thighs with skin removed (I used boneless/skinless thighs)

1. Place soy sauce, lime juice, ginger, garlic, onions and peppers in food processor bowl. Puree until smooth.
2. Transfer to mixing bowl. Stir in vinegar, brown sugar, oil, allspice, molasses, cinnamon, thyme, pepper, nutmeg and cloves and let stand 30 minutes.
3. Place chicken a large heavy resealable plastic bag. Pour marinade over chicken. Seal bag. Refrigerate two days. Turn bag over occasionally.
4. Remove chicken from marinade. Grill or broil. Turn frequently to avoid charring. Serve with rice and peas.

Jamaican Red Bean and Rice

  • 1 1/2 cups dried red kidney beans soaked overnight
  • 2 cloves garlic, smashed
  • 1/2 cup unsweetened coconut milk
  • 3 green onions, chopped (a few more reserved for garnish)
  • 1 habanero pepper, chopped
  • 3 sprigs thyme
  • 1 1/2 cups rice
  • Salt and pepper


  1. Place beans and garlic in a medium pot, cover with water, bring to a boil, then cover and lower to a simmer and cook for a bout 1- 1 1/2 hours and cook until tender. 
  2. Once beans are tender, add in the coconut milk, green onions, habanero pepper and thyme, bring to a boil and add in the rice. 
  3. Cook until liquid is absorbed.  Garnish with green onions.

Final Assessment: Delicious! The combination of sweet, spicy and sour in the marinade, made the chicken absolutely delicious and wonderful fragrant. And really, how could red beans and rice be anything but anything but kick ass

Sunday, November 21, 2010

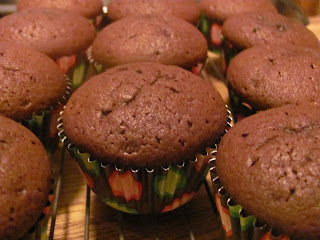
Day 80 1/2! The Imperial Republic of Cupcake


While out shopping last week, I saw an issue of Cook's Country Best Country Recipes at the register. So what, right? Wrong. So, so wrong. Seducing me from the cover of the magazine was a dazzling, yet nostalgic photograph of what I instantly recognized as Hostess Cupcakes. There was absolutely NO mistaking the velvety chocolate crumb, creamy white filling and...wait for it...the curlicue icing across the top of the frosted confections.

Obviously, I wasn't in my right mind because I didn't buy the magazine, but a week later, those Hostess-like-cupcakes were still stalking me. I could have just gone out and bought a pack of actual Hostess Cupcakes, but with all due respect to Hostess, the last few times I've had a Yodel, Ring-Ding, Cupcake or Twinkie (thanks, Tim), I was definitely not transported back to my childhood. Now, I know times have changed since I was a kid and dinosaurs roamed the earth,  but what I remembered as delicious little cream-filled cakes wrapped in crinkly cellophane, tasted artificial and worst of all, the consistency of the filling was simultaneously slimy and gritty. Imagine my delight when I found myself back at the grocery store yesterday, only to discover the magazine still on the shelf as though waiting for me.

The great thing about Cook's  is that they test and report on the hits and misses of each recipe before going to press, so I was pretty sure the recipe would be great. And for the most part, it was...except for the marshmallow filling which was well, too marshmallow-y and not at all like the cream filling I remembered. So I tossed out the first batch and went to work adapting the recipe, keeping the excellent cake, but substituting my own whipped cream filling and and  pipping. Taddahhhhhh!


Cut a wedge out of the center
Cut the tip off the wedge


I used egg whites, cream of tartar and confectioners' sugar for the piping


Chocolate Cream Cupcakes (Adapted from Cook's Country Best Country Recipes)
(Makes 12 Cupcakes)

Cupcakes
1 Cup all-purpose flour
1/2 tsp. baking soda
1/4 tsp. salt
1/2 cup boiling water
1/3 cup cocoa powder (I used Dutch Process)
1/3 cup semisweet chocolate chips
1 Tbsp. instant espresso
3/4 cup sugar
1/2 cup sour cream
1/2 cup vegetable oil
2 large eggs
1 tsp. Madagascar vanilla

Filling
1/2 cup heavy whipping cream
2 Tbsp. confectioners' sugar
1/2 tsp. Madagascar vanilla extract

Glaze
1/2 cup semisweet chocolate chips
3 Tbsp. butter

Icing
1 Tbsp. egg white, at room temperature
1 pinch of cream of tartar
1/2 cup plus 2-3 Tbsp. confectioners' sugar

1. Make Batter Adjust oven rack to middle position and heat oven to 325F. Grease and flour 12 cup muffin tin, or use paper/foil liners. Combine flour, baking soda, and salt in a bowl. In the bowl of an electric mixer whisk water, cocoa, chocolate chips, and espresso until smooth. Add sugar, sour cream, oil, eggs, and vanilla and mix until combined. Whisk in flour mixture until incorporated. Divide batter evenly among muffin cups. Bake until toothpick inserted into cupcake comes out with few dry crumbs attached, 18-20 minutes.Cool cupcakes in tin 10 minutes, then turn them out onto wire rack and cool completely.

2. Prepare Filling Combine  cream, confectioners' sugar and vanilla and whip until fairly stiff.


3. Assemble Cupcakes Microwave chocolate and butter in small bowl, stirring occasionally, until smooth, about 30 seconds. Cool glaze to room temperature, about 10 minutes. As demonstrated in photos, cut cone from top of each cupcake and fill with 1 tablespoon filling each. Replace tops, frost with 2 teaspoons cooled glaze, and let sit 10 minutes.

4. Prepare Piping Fill pastry bag fitted with a small plain tip with piping mixture and, pipe curlicues across glazed cupcakes. Chill until piping hardens up.


Final Assessment: These are un-bleeping-believable. The cake is perfect in both flavor and crumb. The whipped cream filling was a HUGE improvement over the marshmallow filling I'd made the first time around. The main difference is that using real cream requires refrigeration to prevent spoiling. Cupcakes will keep up to 2 days in the refrigerator and up to 2 weeks if frozen.

Friday, November 19, 2010

Day 80! Italy: Polenta Pasticciata Ai Gamberi (Polenta with Shrimp), Stuffed Artichokes, Tuscan Wine Grape Pie and Grape Harvest Cake - Up Next, Jamaica

Polenta Pasticciata Ai Gamberi

A rosemary and parsley bouquet
Okay,  I definitely need six or seven more days to cover even one iota of the dishes I want to make in the beautiful country of Italy. Fresh herbs, olive oil, garlic, wine and simplicity rocked this meal to the nth degree.

The recipes for tonight's meal are collected from a range of family friends, neighbors, a really cool blog and a beautiful coffee table/cookbook my Dad gave me many years ago. Divided by region and accompanied by gorgeous photographs and recipes, Culinaria Italy, is the type of book I leaf through when I'm looking for escape and inspiration.

The stuffed artichoke recipe comes from my dear friend and neighbor, Lina, a gorgeous, fiery Sicilian woman I wouldn't dare cross. She's an unbelievable cook and thinks nothing of hosting an "intimate" party of 60. Despite her crazy schedule, she made time to come over today to give me direct instructions, which I followed to the T - except for adding a squeeze of fresh lemon juice because I just couldn't help myself.

I love my neighbors
The wine for tonight's meal came from my awesome neighbors, Lee DeSorgher and Pat Fuller whose contribution brought an already great meal to insanely heavenly heights.

Now, you may notice there are two grape cakes in this entry. That's because they're both so phenomenal that I couldn't make up my mind, so really, what could I do? I had to make both.

The Tuscan Grape Pie comes from an awesome foodie site, Oyster Culture that posted a wonderful story about eating grape cake on a trip to Italy, and included a recipe I had to try. The Grape Harvest Cake recipe comes from our longtime family friend, Joy - a badass cook of epic proportions who does her best cooking at midnight.

Located in Southern Europe, Italy is famously known for it's boot shaped peninsula along with the islands of Sicily and Sardinia. To the north, Italy borders France, Switzerland, Austria and Slovenia.

Italy's culinary culture dates back the 4th century, BC, and is influenced by Etruscan, ancient Greek and Roman, Byzantine, Jewish and Arabic traditions. Depending on the region, ingredients and cooking techniques vary widely, however, the use of fresh, non-processed ingredients is a commonality shared throughout the country. Cheese, wine, espresso, olive oil, fresh fish, fruit and vegetables are but a few Italian staples.

Were I was lucky enough to be able to dine my way across the country, here's a small sampling of what I might find by region: Sicily, seafood; Sardinia, suckling pig, wild boar and beans; Tuscany Umbra, black truffles; Lombardi, rice and cheese; Vento, risotto with fish ........... I could go on and on.

Black Beauty Grapes for Tuscan Pie
(I could not find wine or wild grapes in November)

Schiacciata con l'Uva
Red Table Grapes
(I could not find Champagne Grapes this time of year)


Northern Italian Grape Harvest Cake
Scoop out the hairy center of the artichoke with a melon baller

Bread crumbs, garlic, provolone, Romano, parsley
and olive oil make the stuffing

Baby Bella Mushrooms
Depending on what kind of edge you want
any of these tools work well to cut polenta
What's wrong with this picture? Nothing!


 Polenta Paticciata Ai Gamberi - Polenta with Shrimp (Adapted from Culinaria Italy)

  • Polenta (I used Pastene)
  • Generous 2 lbs. shrimp
  • 1 handful of fresh mushrooms
  • 1 clove of garlic, chopped finely
  • 1 Tbsp. chopped parsley
  • 3/4 cup white wine
  • 4 cups vegetable stock (or less)
  • Freshly ground pepper
  • Nutmeg


  1. Prepare the polenta to a soft consistency. Cool and cut into slices, and place them on a greased baking. Preheat oven to 350-375F.
  2. Clean the mushrooms and chop finely. Peel the shrimp and saute them in a little butter in a saucepan. Add the mushrooms, garlic, and parsley. 
  3. Pour on some of the white wine and vegetable stock and bring to a boil Add the rest only if needed. 
  4. Season with freshly ground pepper and nutmeg, and arrange on top of the polenta slices. 
  5. Bake for a few minutes in the preheated oven.

Lina's Stuffed Artichokes

  • 4 artichokes
  • 2 cups bread crumbs
  • 1/4 cup Romano cheese
  • 1/4 cup Parmesan or Provolone cheese
  • 1/4 cup chopped parsley
  • 2 cloves garlic, chopped
  • 1/4 cup olive oil
  • Juice of 1/2 lemon


  1. Cut bottoms and tops off artichokes. Steam or boil artichokes until soft for about 15 mintues.
  2. Combine all ingredients.
  3. Gently open leaves on artichokes and stuff with bread crumb mixture.
  4. Drizzle with olive oil.
  5. Bake for about 1/2 hour in 350F oven.

Tuscan Wine Grape Pie - Schiacciata con l'Uva (Adapted from Kyle Phillips)
  • 1 egg
  • 1/2 cup olive oil
  • 3 1/3 cups flour
  • 1 Tbsp. baking powder
  • 1/3 cup White wine or water sufficient to make a smooth, workable dough
  • 2 1/4 lbs. wine grapes, stripped from their stems, washed and drained (you can use Concord, wild or table grapes if you can't find wine grapes)
  • 1/2 tsp. anise seeds
  • 1/4 cup chopped walnut meats
  • 1/2 tsp. freshly chopped rosemary leaves

  1. Heat oven to 400F.
  2. Mix the egg, sugar, flour olive oil, baking powder, and enough wine or water to obtain a fairly soft dough. Knead it till it's smooth, and roll it out to make a sheet large enough to kine and over the pan - a bit thinner than a quarter of an inch thick.
  3. Grease a 9x13-inch cake pan and line the bottom with half the dough, making sure that it reaches about an inch up the sides of the pan. fill the pan with about 3/4 of the grapes; gently squeeze some between your hands as you add them, and leave the rest whole.
  4. Use the remaining dough to cover the grapes, sealing them in with care, then spread the rest of the grapes on top of the schiacciata. Dust the schiacciata with sugar and bake it in the oven for about an hour, or until the crust is browned.

Grape Harvest Cake (Courtesy of Joy Easter)

  • Olive oil and flour for preparing cake pan
  • 2 large eggs at room temperature
  • 2/3 cup sugar
  • 1/2 cup extra-virgin olive oil
  • 1/3 cup non-fat milk
  • 1/2 tsp. pure vanilla extract
  • 1 1/2 cups all purpose flour
  • 3/4 tsp. baking powder
  • Pinch of sea salt
  • Grated zest of 2 lemons
  • Grated zest of 2 oranges
  • 1 1/2 pounds small fresh purple grapes (or red table grapes)

  1. Preheat oven to 375F
  2. Lightly oil and flour 9 1/2 inch springform pan, tapping out excess flour.
  3. In the bowl of an electric mixer fitted with a whisk, beat the eggs and sugar at high speed until thick nad lemon-colored, about 3 minutes. Add the oil, milk, and vanilla, and mix just to blend.
  4. Combine the flour, baking powder, and salt into a large bowl. Add the lemon and orange zest and toss to coat the zest with flour. Spoon the flour mixture into the egg mixture and stir to blend. Set aside for 10 minutes to allow the flour to absorb the liquids. Stir three-fourths of the fruit into the batter. Spoon the batter into the prepared cake pan, smoothing out the top with a spatula.
  5. Place the pan in the center of the oven. Bake for 15 minutes. Remove from the oven and scatter the remaining grapes on top of the cake. Bake until the top is a deep golden brown and the cake feels quite firm, about 40 minutes more, for a total baking time of 55 minutes. Remove to a rack to cool. After 10 minutes, run a knife along the side of the pan. Release and remove the side of the springform pan, leaving the cake on the pan base. Serve at room temperature, cutting into thin wedges.
Final Assessment:  I will have to come back to Italy several times because there are too many things I want to make. This meal was phenomenal. Both cakes were delicious, although very different, one combining sweet and savory flavors. And the shrimp and polenta - well, need I really expound?
Busted....yes, we have chicken nuggets in the freezer :)


Wednesday, November 17, 2010

Day 79! Israel - Vegetarian: Falafel (פלאפל) and Tabbouleh with Tahini Sauce - Up Next, Italy

Falafel with Tabbouleh and Tahini Sauce
Considered the ultimate street food in Israel, Falafel is one of my all time favorite vegetarian dishes.  Wrapped in warmed pita bread, drizzled with garlic and lemon infused Tahini sauce and pilled high with chopped tomatoes, cucumbers and peppers, the nutty crunchiness of Falafel rivals a good steak any day. To accompany tonight's Israeli meal, I also made a batch of Tabbouleh, loaded with fresh parsley and mint from my garden, scallions, tomatoes, cucumbers and lemon juice.

Blechhh


Beautiful


BUT, WAIT!! The first falafel recipe I tried failed miserably. Everything was going along just fine until about 30 seconds into the cooking, when the lovely little falafel balls disintegrated in the cooking oil before my very eyes. I had two recipes, one that used an egg to bind the chickpeas, another that simply used flour...Sooooo....I tossed out the first egg-less mess (and recipe), and started a second batch that used  an egg, bread crumbs and bulgur wheat which went off without a hitch. Phew.

Located on the Eastern Shore of the Mediterranean Sea, Israel borders Lebanon, Syria, Jordan, the West Bank, Egypt and Gaza. It is the only predominantly Jewish state in the world. Israel's rich history dates back to Biblical times. As most are aware, the Israelis and Palestinians have been fighting over land they both believe belongs to them for roughly 60 years.

 For religious Jewish Israelis and religious Muslim Palestinians, to give up or give away their land would be tantamount to committing a sin against God, whom both sides believe gave them the land. It's a rather simple concept, but the religious implications and the complex history make this on-going war one of the most deadly and drawn out conflicts in modern history. Sadly, resolution seems a remote hope.

Israeli cuisine is influenced by the Mizrahi, Sepharic and Ashkeriazi Jews. Arabic, Middle Eastern and Mediterranean cultures also influence Israeli cuisine. Dishes such as falafel, humus, shakshouka, couscous and za'atar (a seasoning I love to use) are all enjoyed by Israelis.


Mint, scallions, parsley, lemons and tomatoes add kick to the tabbouleh's mild flavor

Frying up the way they're SUPPOSED to! Second time's a charm!

Falafel wrapped up in pita bread, drizzled with tahini sauce
  topped with scallions & tomatoes - most excellent.
Falafel (Adapted from World Recipes)
(Makes about 24 balls)

  • 1 lb. can chick peas (drained)
  • 1 large onion, chopped
  • 2 Tbsp. finely chopped parsley
  • 1 egg
  • 1 tsp. salt
  • 1/2 to 1 cup breadcrumbs or fine bulgur (I used both)
  • 1 tsp. cumin
  • 1 tsp. crushed red pepper
  • 1 tsp. chopped garlic
  • Vegetable oil for frying

Combine chick peas, onion, parley, lightly beaten egg and spices. Pulse in food processor. Add breadcrumbs/bulgur until mixture forms a small ball without sticking to your hands. Form chick pea mixture into small balls about the size of a walnut and fry until brown on both sides. Drain falafel balls on paper towels. Serve individually or in pita bread with tahini sauce, filling with chopped tomato, scallions, cucumber, lettuce, humus or anything you like!

Tabbouleh (Adapted from Bob's Red Mill recipe)

2 cups bulgur (pre-soaked for one hour)
3 cups parsley, finely minced
1/4 cup mint, finely chopped
3 scallions, chopped
1/4 tsp. black pepper
1/4 tsp. cumin
1/2 tsp. sea salt
2 medium tomatoes, seeded and chopped
3 Tbsp. lemon juice
1 medium cucumber, peeled and sliced
3 Tbsp. olive oil

Pre-soak bulgur in a bowl with 2 cups of water, let stand 1 hour.
In a large bowl, using a wooden spoon, gently mix together all ingredients, except the lemon juice, oil and cucumber. Add the lemon juice, toss and chill for 1 hour to blend the flavors. Before serving, toss and again with olive oil and add the cucumbers. Serve along side falafel with pita bread.

Final Assessment:  Other than the falafel fiasco with the first recipe I tried, this turned out to be a delicious and satisfying meal enjoyed by my entire family. Leftovers will certainly be taken to work tomorrow!

Sunday, November 14, 2010

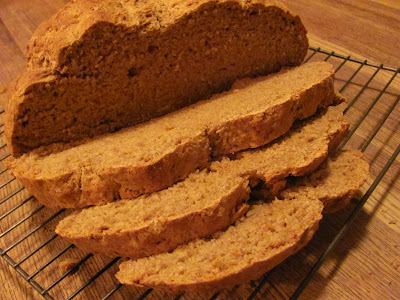
Day 78! Ireland - Royal Hibernian Brown Bread - Up Next, Israel


What to cook for the beautiful country of Ireland from whence many of my relatives came? Known for such wonderful things such as lyric song and poetry, great beer, hospitality, rugby and an emerald country-side, Ireland (perhaps somewhat unfairly), is not known for it's culinary chops. But don't despair, Ireland does produce some pretty amazing bread, and brown soda bread just happens to be the country's national loaf.
 
To find the perfect brown bread recipe, I turned to two of my favorite bread cook books: a dog-eared copy of  Beard on Bread, by none other than James Beard and another extremely comprehensive bread bible, Bernard Clayton's New Complete Book of Breads. Both revered bakers and authors, their brown bread recipes differ slightly, Clayton's adding sugar, butter and an egg to create a lovely rich loaf of brown soda bread that is served up in Dublin's Royal Hibernian Hotel. In my world, anything with butter in it pretty much trumps everything, so I went with Clayton's version, but James Beard's simple recipe is wonderful as well.

Located in Northwest Continental Europe,  Ireland is divided into the Republic of Ireland and Northern Ireland, the likes of which have been embroiled in cultural and religious clashes for hundreds of years. Ireland's culinary traditions are influenced by it's temperate growing climate, and is best known for the potato, which was introduced in the the second half of the 6th century. The country is also known for excellent beef, which it exports world wide. Irish stew, bacon, cabbage and baked goods are the hallmarks of Irish cuisine.

Sea salt adds a lovely crunchy texture to the crust
Butter is worked in by hand until the texture resembles soft breadcrumbs


Royal Hibernian Brown Loaf 
Royal Hibernian Brown Loaf (Adapted from The Complete Book of Breads)
(one round loaf)
  • 2 1/2 cups whole wheat four, stone ground if possible
  • 1 cup all-purpose flour, approximately
  • 2 Tbsp. sugar
  • 1 1/2 tsp. baking soda
  • 1 tsp. salt
  • 1/4 cup (1/2 stick) butter, room temperature
  • 1 egg
  • 1 1/4 cups buttermilk (or 5 Tbsp. butter mild powder plus 1 1/4 cups water), room temperature
1 baking sheet, greased or Teflon
Preheat oven to 400F 20 minutes before baking.
  1. In a bowl mix together all of the dry ingredients. With your fingers, work in the butter until it is absorbed by the fl9our, and the mixture resembles tiny, soft breadcrumbs.
  2. Make a well in the center of the mixture. In a separate bowl, lightly beat the egg and stir in the milk. Gradually pour the egg-milk mixture into the well, mixing first with a spoon and then by hand until it forms a stiff dough.
  3. Lift the dough from the bowl and place on a lightly floured work surface. Work the dough with your hands a dough knife to thoroughly blend all the ingredients. Do not knead. The butter in the dough will make it easy to work without sticking to the work surface or the hands. Sprinkle with flour if it sticks.
  4. Shape into a plump round ball. Pat down the top slightly, and with a knife or razor blade, cut a 1/2" deep cross on the top.
  5. Place the loaf on the baking sheet, and bake until it has browned and has opened dramatically along the cuts, about 45 minutes.
  6. Remove the bread from the oven and place on a wire rack to cool before cutting into thin slices.
Final Assessment: A beautiful, hearty bread that's full of flavor and insanely easy to make - no yeast, no proofing....not problem. Slather it up with butter and call it breakfast, a snack or an accompaniment to soup, salad or a main course.